

What safety precautions should be taken when using sonicators?
Oct 22, 2026
Leave a message
If you work in a lab that deals with cell lysis, tissue processing, or sample homogenization, chances are you’ve used (or at least heard of) sonicators. These tools are super handy—they use high-frequency sound waves to break down samples quickly and efficiently, way faster than manual methods. But here’s the thing: as a sonicator supplier, I’ve seen too many people skip basic safety steps and end up with damaged samples, broken equipment, or even minor injuries. Sonicators aren’t dangerous if you respect them, but they do have some quirks that can catch you off guard if you’re new to them. Over the years, I’ve talked to hundreds of lab techs, researchers, and grad students who’ve had close calls, so I wanted to put together a straightforward guide to the safety precautions that actually matter when using these machines. Let’s dive in.
First off, let’s get one thing clear: sonicators work by sending ultrasonic vibrations through a probe submerged in liquid. That probe can get really hot really fast, and if you’re not careful, those vibrations can cause stuff to splatter. I remember a few months back, a customer reached out saying their entire batch of HeLa cells got contaminated mid-lysis because they didn’t secure the tube right—sample splatter went everywhere, and the sonicator was running without a lid. It was a total mess, and it could’ve been avoided with a couple of simple steps. So let’s start with the basics that everyone should follow, no matter which model you’re using.
First, always wear the right personal protective equipment (PPE). This isn’t just lab protocol—it’s non-negotiable when using a sonicator. I know some people think they’re quick, so they skip goggles or gloves, but trust me: that splatter we talked about? It’s not just sample. If you’re working with hazardous materials like pathogens, chemicals, or even just toxic cell lines, that mist can get in your eyes or on your skin, and it’s not something you want to mess with. I always recommend safety goggles (not regular glasses—they don’t seal properly), nitrile gloves (latex can degrade if you’re working with certain solvents), and a lab coat that covers your arms. Even if you’re running a control with plain buffer, wear this stuff. Better safe than sorry, right?
Next, check your equipment before every use. This sounds obvious, but you’d be surprised how many people skip pre-use checks. Last year, a grad student brought in a broken probe tip on a model similar to our Scientz-E Series Ultrasonic Homogenizer Probe Sonicator For Cell Lysis, Tissue Disruption And Homogenization. The tip was chipped, and when they ran it, the vibrations were uneven—their sample was overheated in spots, and the probe almost cracked the tube holder. Before you turn on the sonicator, take 30 seconds to inspect the probe: look for chips, cracks, or any signs of wear. If the tip is damaged, replace it immediately—don’t try to “make do” with a quick fix. Also, check the power cord for frays, make sure the tube holder is tight, and verify that the lid or safety shield is in place. Most modern sonicators have a safety interlock that won’t let them run if the lid is open, but older models might not, so double-check that interlock works. If you’re using a model like our JY96-IIN Ultrasonic Homogenizer, it has a built-in pre-use diagnostic that runs automatically—take advantage of that feature! It’s there to catch small issues before they become big problems.
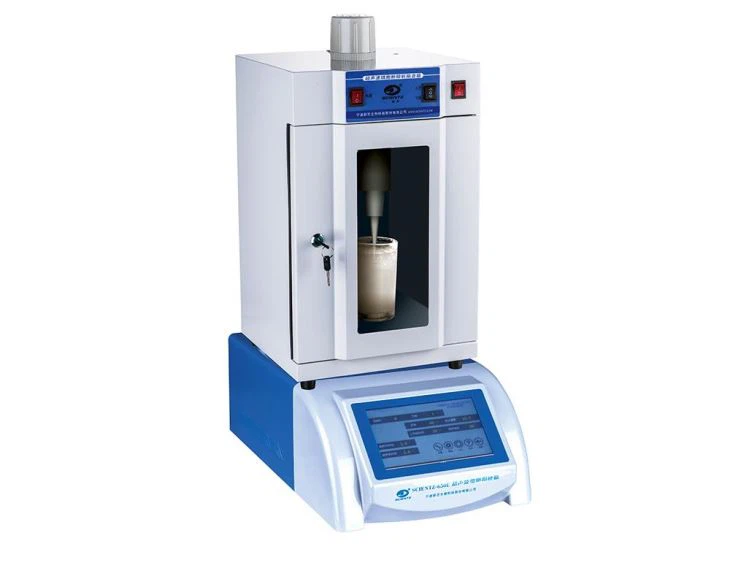

Then there’s the big one: probe submersion and sample volume. This is where a lot of new users go wrong. You have to submerge the probe tip deep enough in the liquid—usually 1–2 cm, depending on the tube size—so that the vibrations don’t just agitate the surface of the liquid (which causes splatter). If the tip is too high, the ultrasonic energy will bounce off the surface, create a mist, and that’s how you get sample contamination. On the flip side, if you submerge it too deep, you might hit the bottom of the tube, which can crack the tube and damage the probe tip. Also, don’t overfill the tube. Each sonicator model has a recommended minimum and maximum sample volume—our Touch Screen Lab Ultrasonic Cell Disruption Homogenizing Processor, for example, works best with volumes between 0.5 mL and 50 mL, depending on the probe size. If you use too much sample, the liquid will splatter over the top when the vibrations start; too little, and the probe might heat up because it’s not fully submerged, leading to overheating and potential probe damage. I always tell people to check the user manual (yes, actually read it—don’t just toss it in a drawer) for your specific model, because volume limits vary a lot.
Another thing: never run the sonicator dry. This is probably the most common mistake I see, and it’s the easiest to avoid. If you turn on the machine with the probe not submerged in liquid, the ultrasonic energy has nowhere to go, so the probe’s temperature spikes super fast. We’ve had customers send back probes that were completely melted because they forgot to add sample buffer before hitting start. Even a 10-second dry run can ruin a probe tip, which is not cheap to replace. Get in the habit of adding your sample to the tube, putting the probe in, and double-checking that it’s submerged before you even power on the machine. It takes two extra seconds, and it saves you hundreds in equipment costs.
When you’re actually running the sonicator, pay attention to the settings. Power level and pulse duration are important, and cranking them all the way up isn’t always the best idea. More power doesn’t mean better results—it can lead to sample degradation, overheating, and splatter. For most samples, a lower power level (20–50% of max) with short pulses (like 5 seconds on, 5 seconds off) is better. The pulse gives the sample time to cool down between bursts, which prevents overheating. If you’re using a higher-powered model like our JY98-IIIN/JY98-IIIDN/JY99-IIDN Ultrasonic Machine Homogenizer Price, it’s extra important to adjust the settings to your sample type. For tough tissue samples, you might need a bit more power, but you still want to keep an eye on the probe temperature—our New Type General Purpose Touch Display Universal Ultrasonic Generator Homogenizer has a built-in temperature sensor that alerts you if the probe gets too hot, which is a huge help. If your model doesn’t have that feature, you can always run the pulse times a bit longer to let the sample cool, or even immerse the tube in an ice bath during sonication to keep the temperature low.
Also, keep your hands and other body parts away from the probe when it’s running. I know this sounds silly, but when you’re concentrating on getting the settings right, it’s easy to accidentally reach over and bump the tube or the probe. The ultrasonic vibrations are invisible, and the probe tip can vibrate at such high speeds that you won’t feel it moving, but it can cause a tiny, painful cut if you touch it. A lot of newer sonicators have a “hold” function that lets you adjust settings without running the probe, so use that. And never try to stop the sonicator mid-run by pulling the probe out of the liquid with your hand—hit the stop button on the machine first. That stops the vibrations immediately, so you can adjust things safely.
After you’re done using the sonicator, there are a few steps to take to clean it and store it properly, which is part of safety too. The probe tip is where all the sample contacts, so you have to clean it right after use. If you leave sample residue on the probe, it can harden and affect the performance of the next run, plus it can lead to cross-contamination. I usually recommend wiping the probe down with 70% ethanol or distilled water immediately after you take it out of the tube. If you were working with sticky or tough samples, you can immerse the probe in a small beaker of water and run a short pulse (with the probe submerged) to clean it. Never leave the probe sitting in the machine for hours with sample on it—clean it right away. Also, wipe down the tube holder and the area around the sonicator to get rid of any spilled sample, which can cause slips or falls in the lab. When you’re done, turn off the power to the machine, wrap the probe in a clean tissue or lint-free cloth, and store it in a dry, safe place where it won’t get damaged.
Wait, let’s talk about hazardous samples specifically, because that’s a whole other layer of safety. If you’re working with anything that’s pathogenic, radioactive, or toxic, you need extra precautions. You should always use a sealed tube or a closed sonicator system to prevent splatter. Some of our higher-end models come with closed processing chambers that trap any mist, which is perfect for these types of samples. Also, make sure you’re working in a fume hood if the sample is volatile or has harmful fumes. I once had a customer who was sonicating a toxic drug compound without a fume hood, and the splatter went on their lab coat—they ended up having to decontaminate the entire coat, and it was a total headache. Don’t be that person. Take the extra 30 seconds to set up in a fume hood if you’re working with dangerous materials.
Another thing that people often overlook: training. If you’re new to using a sonicator, don’t just read the manual once and jump in. Ask a more experienced lab member to show you the basics, especially if you’re using a model that has extra features. All the precautions in the world won’t help if you don’t know how to operate the machine correctly. And even if you’ve been using sonicators for years, it’s good to refresh your knowledge every now and then—technology changes, new models have new features, and sometimes we all pick up bad habits that can lead to accidents.
Now, I know some of you are thinking, “This all sounds like a lot of work. Can’t I just skip some steps?” But here’s the thing: the time you spend taking safety precautions is way less than the time you’ll spend fixing a mistake. A ruined sample means you have to re-run the experiment, which takes hours. A broken probe costs money to replace. An injury means you have to take time off work. None of these are worth cutting corners.
At the end of the day, sonicators are amazing tools that make lab work way easier, but they demand respect. By following these basic safety steps—wearing PPE, checking your equipment, submerging the probe properly, not running it dry, watching your settings, staying clear of the running probe, cleaning it after use, and taking extra care with hazardous samples—you can use them safely and effectively every time.
If you’re in the market for a new sonicator, or you have questions about safety for your current model, our team is here to help. We sell a range of models tailored to different lab needs, from the compact Scientz-E Series for small sample volumes to the high-powered JY99-IIDN for tough tissue processing. We also offer support and guidance on safe operation for all our products, so you can feel confident using your equipment. Whether you’re a grad student just starting out or a senior researcher running a busy lab, we can help you find the right sonicator and keep your lab running smoothly and safely. Reach out to our team to talk through your needs and find the perfect fit for your work.
REFERENCES
- Lab Safety Institute. (2022). Ultrasonic Homogenizer Safety Guidelines. Retrieved from lab safety institute database.
- Occupational Safety and Health Administration (OSHA). (2021). Laboratory Safety: Personal Protective Equipment. Retrieved from osha.gov.
- American Society for Testing and Materials (ASTM). (2020). Standard Guide for Ultrasonic Homogenization of Biological Samples. ASTM International.
- National Institutes of Health (NIH). (2023). Good Laboratory Practices: Equipment Maintenance and Safety. Retrieved from nih.gov.
- Sigma-Aldrich. (2022). Ultrasonic Probe Safety and Best Practices for Sample Processing. Sigma-Aldrich Technical Bulletin.